- Show results for
- Share
What is a Basin Wrench and How to Use It?
Resource Description
Contents
- Introduction
- What is a Basin Wrench?
- What are the Elements of a Basin Wrench?
- How to Use a Basin Wrench?
- How to Maintain a Basin Wrench?
- Conclusion
Introduction
Plumbing requires knowledge, patience, and good tools that won’t let you down. There are plumbing problems that you can handle yourself without calling a professional plumber. If the task is relatively easy, using high-quality tools, even a person without years of experience in this field can achieve desirable results. You just need to know what to do and in what order.
In this article, we will explain what a basin wrench is and how to use it.
What is a Basin Wrench?
A basin wrench (also known as a sink wrench) is used to turn fasteners in hard-to-reach places, for example, the threaded nuts for the installation of a sink faucet.
A telescoping basin wrench is equipped with an extendable shaft so it is easier to reach the nuts that are located behind a deep sink.
What are the Elements of a Basin Wrench?
A basin wrench consists of the following parts:
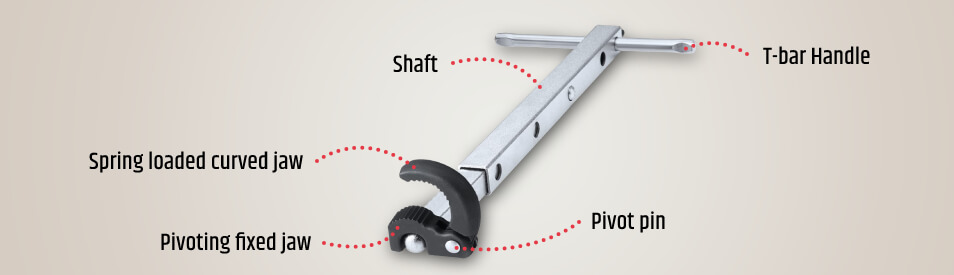
1. T-bar handle passes through the hole in the shaft; the handle is rotated for tightening/loosening a nut/fitting.
2. Shaft is located between the jaws and the handle. The shaft connects to the lower jaw via a special pivot pin at one end. The handle fits through the hole at the other end of the shaft.
3. Pivot pin joins two jaws.
4. Pivoting fixed jaw is attached to the shaft with a pivot pin so the jaw assembly can rotate around its axis perpendicular to the shaft.
5. Spring loaded curved jaw is forced downward & grips on a nut/fastener no matter what position it is in.
The jaws have teeth for better gripping the nut/fitting you need to turn.
How to Use a Basin Wrench?
Using a basin wrench is easy. Follow the steps below.
Step 1 (optional)
Apply lubricant to the mounting nut

If your faucet and mounting nuts have served you for a long time, then this step should not be overlooked.
Spray the threads of the mounting nut using penetrating oil. Then wait for a few minutes before trying to loosen the nut.
Step 2
Adjust the head of the wrench

The jaws should be perpendicular to the shaft.
Step 3
Fit the jaws of your basin wrench around the mounting nut

From underneath the sink, make sure that the jaws of the wrench fit tightly around the mounting nut.
As the head of the basin wrench is movable, the claw can grab the nut from any position around it.
It is important to use the right size of the basin wrench. If your wrench is too big, its jaws won’t fit snugly around the nut.
Step 4
Turn the nut

Using a T-handle, turn the shaft of your basin wrench to tighten or loosen the nut. Turning clockwise, you will tighten the nut, counterclockwise - loosen.
Additional Tips
- If it is impossible to reach the nut using a regular basin wrench, try using a telescoping basin wrench as it has an extendable handle.
- If you need to increase the leverage on the T-handle to remove the nut faster and easier, you can use the back end of an adjustable wrench.
- If you can’t remove the nut using your basin wrench, cut the nut using a hacksaw or a reciprocating saw. When choosing the blade for your reciprocating saw, make sure it is suitable for working with the material the nut is made of.
How to Maintain a Basin Wrench?
To keep your basin wrench in good condition, it is recommended to follow a few simple steps:
- After using, clean the tool with a piece of cloth.
- From time to time, spray the pivoting joint using light machine oil.
- In case any corrosion occurs, wipe your basin wrench with a cloth that is moistened with oil.
- Store your tool in a dry and clean place.
Conclusion
Now you understand what a basin wrench is, know its elements, and have an idea about using this tool. In addition, we figured out how to maintain a basin wrench to keep it in the best condition possible.


