- Show results for
- Share
How to Use Flaring Tools
Resource Description
Definition & Types
A flaring tool utilizes pressure so a fabricated mechanical joint is made for joining/sealing copper tubing with a flare connection. As a result, you can connect tubes to each other/other fittings.
You can see different shapes and sizes of these instruments. Pay attention that flaring tools for tubing and piping are different:
- tubing flares: 45 degree angle;
- piping flares: 37 degree angle.
The bar flaring tool is considered to be the most popular. It is specially created for use in hard-to-reach areas. It is made to grip the tubing. Butterfly nuts at both ends of the bar provide the pressure for gripping the tubing.
Construction
To understand, how to use something, it’s important to know how it is built.
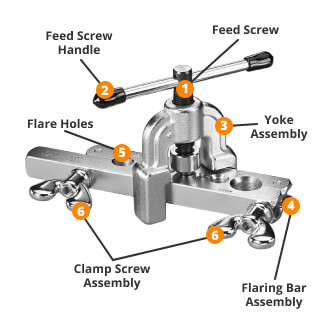
These instruments have a simple construction:
- Feed Screw goes into the pipe opening for expansion (if necessary).
- Feed Screw Handle is used for convenient turning.
- Yoke Assembly - the yoke of the tool slips over the bar and then locks with a turn.
- Flaring Bar Assembly is a metal bar that has
- Flare Holes that are suitable for various pipe/tube sizes.
- Clamp Screw Assembly provides the pressure for gripping the tubing.
Usage
Here are some steps that describe the usage of these instruments:
- First, slide the tubing into the correct size slot & then place it at the height you want the flare.
- After that, tighten down the grip of the bar on the tubing. Often, people tighten the butterfly nuts incorrectly. Make sure that you first completely tighten the nut that is the nearest to the tube. Tighten it as much as you can manually.
- Then, tighten the other nut and the bar should have a sufficient grip on the tubing. Don’t put too much effort - there’s absolutely no need to tighten until the two bars touch.
- The forged steel yoke of the tool will slip over the bar and then it will lock with a turn.
- Rotating the precision threaded feed screw clockwise draws the tip of the cone of the instrument into the tubing & then proceeds to drive the copper into the beveled mating surface of the flaring bar, gradually widening the end of the tubing. You can back the cone off a couple of times during the process of driving the cone into the tubing to burnish the copper for a better seal. Keep the flaring cone clean & the tool lightly lubricated so it operates properly.
It is recommended to read carefully the user’s manual (provided by the manufacturer) so that you use the instrument as efficiently as possible.
On Mega Depot, you can choose from a wide range of flaring tools as well as flaring tool kits, including the ones by Yellow Jacket. Shop with us & make the right choice!


