- Show results for
- Share
How to Connect PVC Pipe in Different Ways
Resource Description

PVC pipe is a pipe that is made of polyvinyl-chloride. PVC pipes are commonly used in different residential applications, for the plumbing system or cool craft projects such as DIY racks or furniture. When you connect PVC pipe to a pipe fitting, it requires special soldering iron or special cement, that works as a chemical solvent and melts the surface of the PVC pipe, and then connects two items together, thus providing airtight, leak-proof results.
There are several ways to connect PVC pipe and the best are with special cement and with a soldering iron.
How to Connect PVC Pipe with a PVC Cement
All the connectors in the PVC piping system are particularly welded together due to a chemical solvent, whether the system is used for the drains or vents in your house plumbing or it works as a part of the central vacuum system.
The solution cement, which is used to fix both of the pieces, particularly melts a thin layer of the PVC, that dries in the seconds after you put the pieces together and creates a smooth, waterproof and airtight seal.
The working process is quite simple, however, there can be made some mistakes during the connection and the only way to correct them is to cut everything off. There are some clues on how to connect PVC pipe with PVC cement, preventing any mistakes.
Step 1: Measure the PVC Pipe and Cut
To be sure that the PVC pipe has been entirely connected with its fittings, measure the space between the shoulders on the fitting at each endpoint of the pipe.

Transmit this measurement to the PVC pipe and make a direct cut, using a hacksaw. Scratch the inside of the cut smooth, using the utility knife.
Step 2: Dry Fit
Gather and compare everything to be sure that you cut the pipe at the correct length. On the elbow fittings, the position is significant, that is why mention a mark from the pipe onto the fitting.

Step 3: Prime
Pull the PVC cement primer on the outside part of the PVC pipe and the inside part of the fitting where they will connect together. The PVC cement primer will soften and clean the plastic.

Step 4: Glue
Lay the PVC cement to the primed space on the inside part of the fitting and to the outside part of the PVC pipe.

Step 5: Push and Twist
Slide the PVC pipe into the fitting until it touches the bottom of the fitting’s shoulder, then make a ¼-inch turn to let the glue be spread and speed its cure.

When you fix the fitting, press it in the mentioned marks slowly out of the register and twist the fitting to adjust the marks. Hold the fitting for half a minute and then clean any extra PVC cement with a dry cloth.
How to Solder PVC Pipes
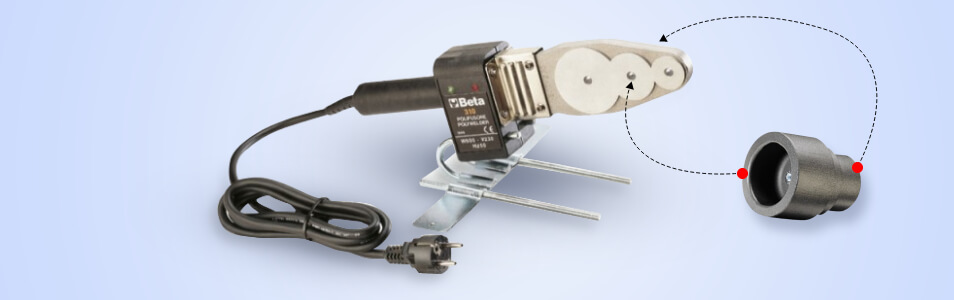
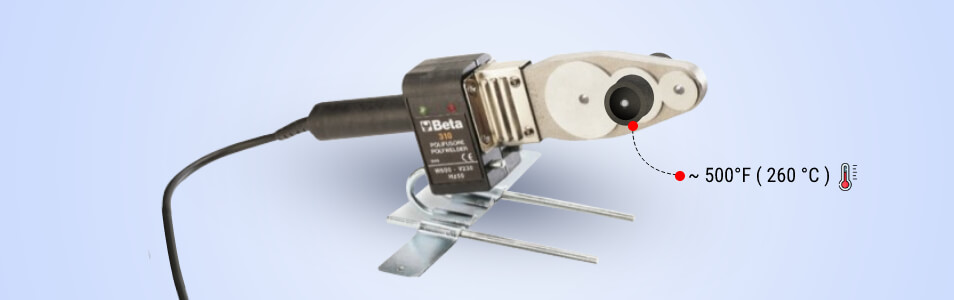
Special soldering iron with a heating element, where the sleeves of the needed diameter are attached, is used for soldering PVC pipes. This equipment is also called the ironworks (it is commonly so used as slang by professionals) with the use of the industrial network or voltage. For the hot soldering of the PVC pipes, the soldering iron with nozzles is used according to the diameter of the pipes you need to solder.
Nowadays, there are a lot of models of the soldering iron in the trading network that provides you doing soldering of the PVC pipes with your own hands. When you choose the soldering equipment, pay attention to the availability of the temperature controller and the clearance of the instructions, thus you will be able to meet all the technical requirements and the soldering will be as fast and durable as possible.
When you want to get the soldering iron, please pay attention to the aspect that may be useful for you:
The material of the devices you are going to use;
The presence, and the set of the nozzles. The set commonly consists of a pair of nozzles for several diameters;
The power. Soldering PVC pipes with a diameter of ⅝ - 23/64 inches (16-63 mm), you can use the soldering device with a capacity of 850 watts. If the diameter of the pipe is ⁵⁹/₆₄ inches (125 mm), you will need the more powerful equipment from 1200 watts. The maximum power that is optimal for soldering the PVC pipes is 1,5 k.W.
Selecting the soldering equipment for the PVC pipes by the value of the aspects, without doubt, you will be able to solder PVC pipes at home on your own.
Step 1:
The working process is performed according to a single system. You may measure the PVC pipe to the needed length by using a tape measure.

Step 2:
Take the joints. To be sure that the items are connected perfectly, cut the ends of the PVC pipes with a pipe cutter.

Step 3:
Take a nozzle and put it on top of the soldering iron that provides heat to go to the joint.
Step 4:
Switch on the soldering iron, using your household power supply, and wait until it warms up the nozzle.
Step 5:
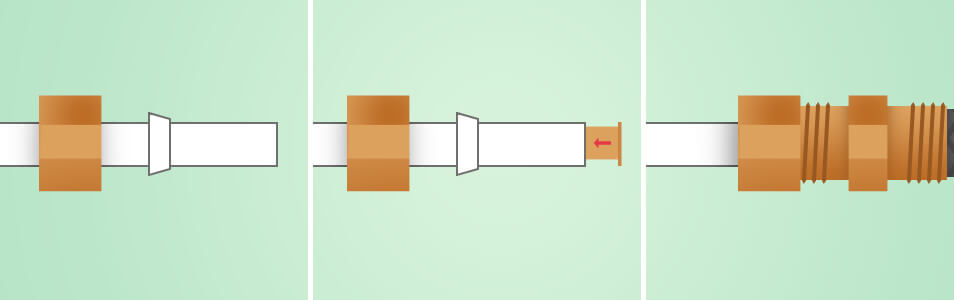
Take a coupling sleeve and put it on one end of the heated nozzle and put the pipe into the other end.

Step 6:
When the outside area of the PVC pipe and the inside area of the coupling have warmed up, remove the items from the nozzle.

Step 7:
Take the PVC pipe and press it into the sleeve by pushing one item into another. When the items cool and harden, the PVC pipe will restore its features and a single crust will be created as the result. The crust will insulate the joint.

Step 8:
When the seam stabilizes, repeat the procedure at the free end of the coupling with the next items of the pipeline.
*Note: Before soldering, be sure that the cut is accurate and straight. Try to make some control cuts without fail, determining an angle of 90 degrees, and then remove any burrs with sandpaper.
How to Connect PVC Pipe with A Compression Coupling
Step 1:
Prepare the ends of the PVC pipe you are going to connect. Measure the needed length of the pipe and remove burrs on its edges. If you don’t remove burrs from the pipe edges, the pipe won’t fit the fitting.

Step 2:
Unscrew the compression nut from the coupling and remove the compression ring. Slide the nut and ring into the end of the PVC pipe and the tube that goes inside the pipe. Push the end of the PVC pipe entirely into the fitting, and screw the nut into the fitting.
Step 3:
Fix the nut with tongue-and-groove pliers or wrench, but try not to overtighten it. The nut tights the ring, thus creating a watertight seal.

Tips For Proper Work With PVC Pipes
1. Choose the proper type of PVC cement
There is a variety of cement on the market that is matched to different types of plastic pipes. That is why read the labels and descriptions of the product carefully. Pay attention to the cement that is made specifically for PVC pipes. Be careful with the cement for CPVC pipes (chlorinated polyvinyl chloride), which is quite similar in name, but they are not the same.
2. Check the items you're going to connect
Before gluing, take all the pieces of the PVC pipe, and check such aspects:
- The PVC pipe and fitting match together;
- The cut is made properly;
- The length is measured correctly;
*Warning: DON’T glue wrong pipes together.
3. Don’t neglect safety rules
PVC cement is quite a messy solvent to work with and manufacturers advise avoiding eye and skin contact with it. That is why, before starting working with the PVC items, put on safety goggles and protective gloves. It is also recommended to lay a mop or a towel on your working surface to protect it from messy spots on it and to minimize quite a difficult cleanup. As you already know, PVC cement is a chemical solvent, that is why be sure that your working area is provided with a good ventilation system.
4. DON’T leave jagged edges
When you cut the PVC pipe with a hacksaw or a pipe cutter, check the edges of the pipe. The edges should be smooth. That is why try to check and remove any burrs on the edges, using coarse sandpaper or a utility knife. Burrs may cause clogs or lessen the effectiveness of the pipe working.
5. Try to do work fast
When you apply the cement, you have only a few seconds before you connect the PVC pipe with the fitting. The gluing process goes very quickly. That is why, if PVC cement dries before you are ready to connect the PVC items, reapply it one more time.
6. Do some turns for the secure fit
Turn the PVC pipe for a quarter of the way when you press it into the fitting, thus allowing the glue to spread, providing a tighter fit. Hold the PVC pipe and fitting together tightly for at least half a minute, to prevent the pipe back out.
7. Leave the PVC pipe to dry for at least 20 minutes
When you hold the PVC pipe for half a minute, leave it for at least 20 minutes to dry, allowing the cement to be spread properly. Do the work according to the product’s instructions, paying attention to how long the PVC cement should cure before you start using it.