- Show results for
- Share
How and Why to Use Crimping Tools?
Resource Description
Success Depends on the Crimp You Use
A proper crimp is the key element of an overall wire termination assembly that unfortunately is all too often overlooked. Proper terminal selection, application, and crimping are critical factors to the safety, performance, and reliability of an electrical connection. When selected and installed properly, the function of a terminal is transparent in the overall operation of a product; however, when selected or installed improperly, it can result in rework, recalls, and downtime, which could result in loss of productivity and profitability.
To produce a high-quality crimp you can rely on to resist failure, you need the right terminal, crimping tool, and technique.
Here are the necessary instructions for you to:
- Select the right terminal for a specific application
- Select the right tool for the terminal and the application
- Produce a high-quality crimp
1. Select the proper terminal for the application and wire size used
1.1. Ring terminals are used for high-vibration and grounding applications;
1.2. Fork terminals are used for static (non-vibration) applications;
1.3. Disconnects are used for applications that require quick connection of wires without the use of tools;
1.4. Splices and wire joints are used to join wires together.
2. Strip wire to the proper length. Strip the insulation off the end of the wire, making the exposed portion just a little longer than the metal portion of your crimp connector.
3. Select the proper crimp tool to be used. Use crimping tools that provide a UL Listed and/or CSA Certified electrical termination to assure a safe and reliable connection.
4. Select the proper crimp pocket for the terminals and wire size you are using.
5. Twist the strands of wire together with your fingers to make them easier to insert into the connector if you are crimping stranded wire.
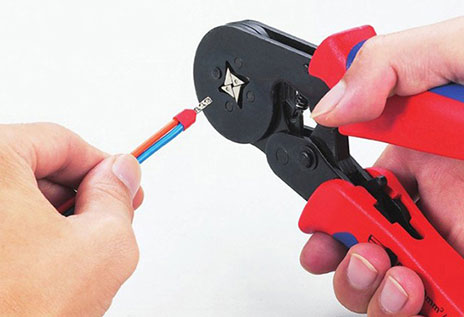
6. Insert the bare wire end into the connector, making sure that it is contacting the metal portion and only insulated wire is showing outside the connector.
7. Match the color on the crimping tool (if the tool in use has any) to the color of the connector, place the connector in the tool and squeeze hard. Depending on the length of the connector, you may be able to do this in several places to ensure that you have made a good connection.
8. Wrap the whole connection with electrical tape for added security if desired.
Tips![]()
- Always leave a little extra length when you are cutting your wire in case you don't get the crimp right and have to cut it off and start over.
- Be careful with the wire ends, they are sharp, and can poke little tiny, painful holes in your fingers.
|
A Hose Crimper Use or How to Repair a Water Pipe Things You'll Need:
|

|
Instructions:
1. Removing the Broken Pipe Section
- Place the U-shaped fitting of the water supply shut-off wrench over the flange on the shut-off valve of the water supply meter. Twist the wrench until the water stops flowing.
- Locate the source of the leak. If it is under the house, the pipe may be covered by the under-floor insulation. Slice the insulation open with a knife or other sharp tool. Try not to slash the insulation more than necessary. You'll need as much of it intact as possible to replace it after the job.
- Pull the pipe away from the insulation. Cut the section with the leak (or leaks) out of the broken pipe with the pipe cutter. Be sure the cut is clean and smooth.
- Go to a home improvement or hardware store and purchase pipe and couplings. Most mobile home potable (drinkable) water piping is 1/2 inch, but to be sure, take the pipe section to the store and shop for the correct-sized replacement pipe and couplings.
2. Installing the New Pipe Section
- Trim the ends of both the old and new pipes with the pipe cutter so that all the pipe ends are smooth and straight. Be sure you leave enough length that the pipes can be fitted together easily without bending too much or crimping. Include the length of the coupling in your estimation.
- Measure the length from the end of the fitting to the measurement line and mark that length on the pipe with a pencil.
- Insert the PEX pipe insert into one end of the new pipe. Firmly push the pipe into the coupling up to the pencil marking. Repeat this for each end of the new pipe section.
- Insert PEX pipe inserts on each end of the old pipe. Firmly push the coupling on the replacement pipe into one end of the old pipe until it creates a snug connection.
- Push the remaining replacement pipe coupling onto the coupling on the old pipe. Check to be sure that all connections are snug and that the repaired section has no crimps.
- Turn the water on slowly at the water supply valve. Check for any leaks or areas of strain. Ease the repaired section back up under the insulation.
- Wait several hours for the insulation to dry, then seal the opening in the insulation with duct tape.
Tips![]()
- There are other methods for attaching couplings, but they are more expensive, require expensive tools, and may not hold as securely. If you have the old, gray polybutylene pipe, you may want to replace all the potable water lines under your home with PEX pipe. Polybutylene will likely eventually develop leaks, and you will end up replacing long sections of the pipe 6 inches at a time.
- PEX pipe deteriorates very quickly in direct sunlight. Do not install or store it in direct sunlight.
- Many older homes had polybutylene (PB) pipe, which was prone to leaks and breaks. Manufacturers of the PB pipe settled several lawsuits as a result of these problems. Unfortunately, those suits are now closed.


